Tuesday, November 5, 2013

Full Bust Adjustment (FBA) - tutorial på svenska

If you want to read this post in english, go here


Varför och när behövs en FBA 

De flesta mönster är konstruerade efter byst med kupstorlek B (ibland C). En kupstorlek är ett relativt mått och ingen fast volym. Det innebär att du kan ha B-kupa både om du har storlek 32 eller 48 i övrigt, men B-kupan för storlek 48 har mycket större volym än den för storlek 32. Om mönsterkonstruktörerna skulle ta hänsyn till olika kupstorlekar så skulle de behöva göra ett mönster för varje kupa - i VARJE STORLEK! Fatta det mönsterpappret!!! Det skulle vara helt galet så man förstår lite poängen med att de håller sig till en enda kupa (den vanligaste?) och låter oss sköta finjusteringarna hemma. Allt var enklare förr när vi alla var Barbies ;-)

Detta besvarar även frågan om VARFÖR I HELA FRIDEN kläder i butik aldrig passar helt bra. Anledningen är den. Alla är sydda efter samma kupstorlek...

Så. För er som tycker detta med FBA är lite läskigt, eller som tror att en FBA kommer att förstöra designen på ditt plagg, ta't lugnt. Det är faktiskt ganska enkelt och man gör det för att motverka att designen förstörs.

Jag kommer att visa en FBA på Alma Blouse från Sewaholic Patterns. 


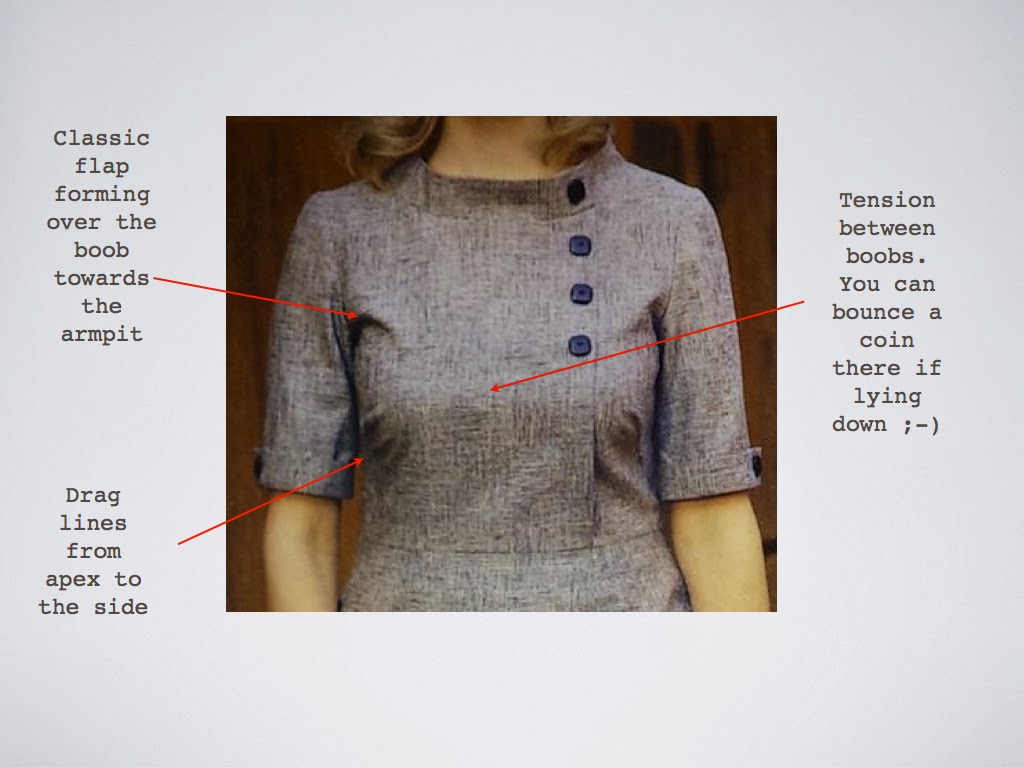
Tecken på att en FBA behövs


Foto lånat från sömnadsmagasinet Ottobre, nr 5/2011

Om du nu skulle strunta i FBA och istället lösa problemet med att bara ta en större storlek? Ingen bra idé eftersom du då får andra mått även kring axlar och midja. Bara för att du har större byst så är inte allt annat nödvändigtsvis större, eller hur?

På denna bilden har jag på mig min första Alma. Då gjorde jag just det, nämligen struntade i FBA och tog en större storlek. Visseligen ingen katastrof (jag använder den ändå ibland) men det finns definitivt en del att önska om du är petig, som jag. 

Ingen FBA, stor storlek för att rymma byst.

En annan 'klassiker' som vi alla känner till allt för väl är skjortan med knäppning, där vi inte vågar röra armarna av rädsla för att knapparna kommer flyga av (har du någonsin tejpat, sytt, säkerhetsnålat eller limmat lite i knappslån för att känna dig säker?). För egen del hade jag precis gett upp tanken på skjorta helt och hållet innan jag lärde mig FBA. 

En annan bild som visar detta (vilken konstnär man är!):


Du ser att det gröna "tyget" behöver vara betydligt längre än det röda "tyget" för att nå ner till samma midjepunkt. Denna teckning är tänkt att lugna er som tror att en FBA kommer göra ert plagg större eller tältigare. Det blir det inte, men bysten får plats.

FBA-processen

Nu är det då några steg att ta i en viss ordning för att lyckas med mönsterändringen. Det finns säkerligen massvis av olika sätt att göra detta men jag kommer visa hur jag gör. Om du sitter på ett bättre sätt, berätta gärna! Jag vill gärna lära mig mera!

#1 Hitta din storlek och rita av mönstret!!

Kanske onödigt att säga, men vi kommer att klippa en del  - så rita av mönstret så att du inte förstör orignalarket. Vem vet, du kanske behöver göra en annan FBA om några år.

Vilken storlek ska jag välja? Inte jätteenkelt att besvara, eftersom vi alla ser så olika ut. Vissa är breda över axlarna och andra har lite mage att ta hänsyn till osv. Om du sytt lite innan så har du kanske en uppfattning om hur du normalt brukar passa in i mönster? Om inte, så rekommenderar jag att mäta ditt "över byst"-mått istället. Detta mäter du genom att dra måttbandet runt ryggen, under armarna och ÖVER byst (istället för där du är som störst). Dra åt ordentligt. Mät sedan midjan (där du är som smalast), höft osv och välj den storlek som passar dessa tre mått bäst.

För min del så har jag lärt mig att mina axlar passar bra in i de flesta mönster så om jag mäter midjan så räcker det oftast som mått för att kunna välja storlek. Byst tar vi ju hand om snart.

Mina mått:
Över byst:: 36 inches
Midja (naturliga midjan): 30 inches

Enligt mått-tabellen på mönstret motvarar dessa mått exakt stl 10. Det betyder att om jag hade B-kupa så hade stl 10 passat som hand i handsken. Som referens kan jag berätta att mitt "riktiga" bystmått, där jag är som störst, är 39 inches = 3 inches större än tabellens stl 10.

Jag kommer alltså rita av storlek 10 på mönsterarket, precis som det är, och klippa ut det.

Storlek 10 direkt från mönstret. Insnitt ritade i gult. 

#2 Hitta din bystpunkt och se till att insnitten pekar mot den.

Detta steget är viktigare än man kanske kan tro, jag kommer förklara varför snart, så hoppa inte över detta.

Om du tittar på mönstret så pekar insnitten på samma punkt - bystpunkten. Bystpunkten är den yttersta punkten på bröstet (oftast bröstvårtan, men inte alltid). Om du springer rätt in i en vägg så är bystpunkten den punkt som träffar väggen först, om inte näsan hinner före då. ;-)

Markera din bystpunkt på mönstret. Sitter den på samma plats som möntret hade tänkt? Grattis i så fall, du kan hoppa till #3. 
Om inte, så marcherar du till närmsta plastikkirurg och ber att få flyttat dina bröstvårtor till rätt plats. ELLER så ändrar vi mönstret, vilket jag föredrar. Det är billigare också. 

Originalbystpunkt är gul, min bystpunkt är blå. 
 Som du ser så är min bystpunkt en bra bit ifrån originalets bystpunkt. Nu behöver jag se till att insnitten pekar mot mitt blåa X istället för det gula.

Den lättaste ändringen är att flytta midjeinsnittet. Lägg på en snutt mönsterpapper och rita av insnittet. stoppa sedan den under mönstret där du skulle vilja ha insnittet och rita in den. Klart. Nu ser mitt mönster ut så här:

Det blå är mitt nya midjeinsnitt.

Nu finns det två sätt att ändra bystinsnittet så att det pekar på rätt bystpunkt. Ett sätt är att du behåller markeringarna i sidan och bara riktar om insnittets spets, och sedan kollar att du har rätt längd på insnittets ben. Anledningen till att jag inte föredrar detta är att det faktiskt ändrar designen på plagget lite (om man ska vara petig) - insnittet skulle i mitt fall då luta lätt nedåt istället för lätt uppåt.

Det andra sättet är att flytta hela insnittet nedåt med lika många cm som som du flyttat bystpunkten, i mitt fall 3 cm. Innan du gör denna operation kan det vara bra att vika ihop originalinsnittet och rita av hur kantlinjen ser ut, så att du har samma kantlinje även efter att insnittet är flyttat. 

Det blå insnittet är mitt nya, flyttade insnitt. 3cm lägre än det gula.
Klipp bort pappret mellan de gamla "benen" så att du får rätt sidolinje. Vik ihop ditt nya insnitt och kolla att benlängd stämmer och att sidsömmen blir rätt.

Okej, varför var allt detta krångel så viktigt nu då?
Jo, nu när allt pekar mot bystpunkten så kan du ändra järnet i nästa steg och ändå vara säker på att du bara lägger till tyg där det behövs - och att du inte får extra tyg i armhålor, midja eller andra mystiska ställen. Dessutom är det ganska fult med insnitt som inte pekar rätt, tycker jag. 
Detta gäller för alla typer av FBA. I alla fall alla som jag har provat. Så länge du gör själva FBAn igenom dina insnitt (eller veck, där du har sånna istället) så ändrar du inte plaggets design, oavsett typ av insnitt eller hur de är riktade - hurra!

Så, NU är vi äntligen redo för den riktiga operationen!

#3 - nu gör vi FBA!!!

Om du minns från #1 ovan, så behövde jag justera mitt mönster med 3 inches = 1,5 inch (4cm) på en mönsterhalva. En tumregel är att justera med 1cm per kupstorlek över B, vilket skulle innebära att jag då har kupa F - och det stämmer. :-)

Men - en annan aspekt att ta med i beräkningarna är att jämföra med plaggets färdigmått (finns ofta angivet på mönstret). För mitt bystmått på 39'' motsvarar det ett färdigmått kring byst på hela 43''. Det är betydligt mer rörelsevidd än jag vill ha, ens för en rymlig blus. Därför har jag beslutat att göra halva detta, dvs 2cm på en mönsterhalva i stället för 4cm.

Nu är det dags att skära i mönstret! I detta steget rekommenderar jag varmt att jobba över ett rutnät. Skärmatta är idealiskt.

Kom ihåg att jag sa att vi vill skära inuti insnitten för att behålla plaggets design.
  1. Första snittet går lodrätt från midjan, genom midjeinsnittet, upp till bystpunkten.
  2. Nästa snitt går från bystpunkten till armhålan. Sikta mot någonstans på nedre tredjedelen av ärmkurvan, men klipp inte hela vägen fram! Lämna några millimeter av pappret.
  3. Nästa snitt är från sidan, genom bystinsnittet, till  bystpunkten, men klipp inte ända fram. Lämna någon millimeter även här, precis innan bystpunkten. 
  4. Sista snittet är horisontellt från mittlinjen till linjen genom midjeinsnittet. Klipp rakt igenom.
Alla snitt är markerade med rött i bilden:

Nu så ville jag ju justera min halva med 2 cm. När jag klippt och dragit isär mönsterbitarna ser det då ut såhär:


Lägg ett nytt mönsterpapper under dina bitar, tejpa, och rita in dina insnitt igen (och kontrollera längden på benen så att de passar ihop):

Lägg märke till att dina insnitt nu är längre än originalets insnitt (de gula). Detta är ju helt logiskt när man tänker på det. Om du viker en kon av papper så måste du ju ha ett längre insnitt för att få en hög kon än om den ska vara låg. Hög kon = större byst (eller BH a´la Madonna).

Om du vill vara supersnoffsig så ritar du nu av hela alltet på ett nytt papper, men annars klipper du bara runt det ändrade och så är det klart!

Färdigt mönster!!
Nu, iväg och sy med dig! Resultatet bör bli ungefär som följande bilder (där jag burit plagget några timmar om du undrar om jag inte har lärt mig stryka).


Fortfarande har plagget bra med rörelsevidd, men faller fint över kroppen utan konstiga veck och rynkor. Jämför med den ljusblå Alman jag visade tidigare...  I rest my case.

/Alexandra

Demystifying the Full Bust Adjustment (FBA) - tutorial

På begäran finns detta inlägget även på svenska. Det hittar du här.

Why and when you need to make an FBA 

Most patterns are constructed with a cup size B in mind (sometimes a C). A cup size is a relative measure and not a fixed volume. That means that you can be a B-cup and still span across sizes 0-18 (or whatever) - the volume of a B cup size 18 is a lot bigger than a B cup size 0 . If the pattern maker should cater for all cup sizes they would need to make one pattern for every cup size AND every size!! Imagine that pattern sheet!!! Gee, that would be crazy, which is why they stick with only one cup for all sizes and let us do the adjustments at home. It was so much simpler when women were all Barbies. ;-)

See that should probably answer your question on WHY ON EARTH clothes in the store never ever fit you right. Same reason. All made for the same one cup size...

Now. For those of you who are a little intimidated by this, or that may be afraid that you are changing the design of the garment. Chill out. It is really quite simple and this is done to KEEP the design and not to distort it.

I will be showing FBA on the Alma Blouse from Sewaholic Patterns. 


Signs that you need an FBA


Fashion photo borrowed from Ottobre 5/2011, sewing pattern magazine.
If you would solve the above problems by just wearing a larger size, then the fit around your waist and shoulders will not be great. Just because the boobs are big, you haven't changed your frame, right?

In this picture I am wearing my first Alma. I did just that, i.e. no FBA and went with a larger size.  No complete disaster but there is definitely a lot to ask if you're picky, like me.

No FBA, larger size to fit the bust.


Another 'classic' we are all much too aware of, is the buttoned shirt where you are afraid to move your arms in case the buttons will pop off (have you ever taped, sewn, safety-pinned or glued the fabric in place between the boobs to feel secure?). I was just done wearing shirts altogether until I learned about FBA.

Another graphic to illustrate this (I am such an artist!):


You see that the green "fabric" needs to be way longer than the red "fabric", even though the neck and the waist are in the same places. This drawing is necessary to calm those of you who fear your garment will be bigger and tent-like after a FBA is done. It won't be, but your boobs will fit.

The FBA process

Now there are certain steps to take in order to succeed with the pattern alteration. I am sure there are many different ways to do this, but this is how I do it. If you have a better way, do tell! I am eager to learn!

#1 Find your size and trace your pattern!!

Really goes without saying, but you will be doing some cutting so don't spoil the original sheets.

What size to cut? It is not always a clear answer to that, since we are all different. Some women have broad shoulders and should select a size that accommodates them, while others have a tummy to include in the game. If you have sewn some in the past you may have an idea on how the rest of your frame fits into patterns? If not. Do measure your "high bust" measurement instead. That is putting a tape measure under your armpits, around your back and OVER your bust (as opposed to across your widest part). Then measure your waist, hips etc and select the size that is closest to fit.

For myself I've learned that my shoulders are pretty average and usually fit into patterns without alteration so I just go by the waist measure and that's my size. The boobs will be taken care of soon.

My measures:
High bust (as described above): 36 inches
Waist (my skinniest part of the torso): 30 inches

According to the pattern back table those measures are exactly a size 10. Meaning that if I had a B-cup, a size 10 would fit me like a glove. For reference my real bust measurement is 39 inches = 3 inches larger than the size 10 of the table. 

So, I will now trace a size 10 exactly as is and cut it out.

Size 10 straight from the pattern. Darts in yellow.

#2 Find your apex and make sure the darts point to it.

This step is more important than you might think, you'll see why in a minute, so don't give this a miss.

If you look at the pattern, all darts usually point towards the same point - the apex. Apex being the highest point of your chest (for most people, the nipple). If you run right into a wall, your apex is the point that hits the wall first, unless your nose beats you to it ;-)

Mark your apex on the pattern. Is it in the same place as pattern wants it to be? Congratulations, move on to #3. If not, go to a plastic surgeon and have your nipples moved into the correct location. OR, you can alter the pattern, which is what I prefer. It is cheaper too.

Original apex marked yellow. My apex marked blue.
 As you can see in the picture my apex is quite far off the original location.  Now I need to make sure the darts point towards the blue X instead of the yellow.

The easiest thing is to move the waist dart. Just put a piece of paper over the yellow one and copy it. Then put the copy in the position you want UNDER the pattern sheet and then just trace a new one. My pattern now looks like this:

Blue is my new waist dart.

Now there are two ways of changing the bust dart so that it points towards YOUR apex. You either just start at the side markings of the dart and adjust the angle of the point, then true up the dart legs. The reason I don't prefer to do it this way is because you then change the design of the garment (if you're picky). The bust dart will then, in my case, be tilted slightly downwards instead of more upwards. 

The other way to do it is to lower the entire dart the same amount as your apex is lowered, in my case 3 cm. Before you do that it is wise to fold up the current dart and mark the sideline of the "sewn" garment so that you know what it should look like after you have moved the dart.

Blue is new bust dart, 3 cm lower than the yellow.
Cut off the paper between the yellow dart legs (marked blue line) and fold up your new dart to verify the shape of the side seam.

Okay, so why was all this hassle important again? Well, now that everything points towards apex you can go crazy in the next step and still be sure that you add fabric only in the right places - without adding to your waistline, armpits or other places!!! And it kind of looks shitty when a dart points in the wrong direction too. And this goes for other types of FBAs too! As long as you keep your FBA in the middle of dart and/or tuck markings you are not distorting the design - it doesn't matter from what place or angle the dart/tuck originates!! Beautiful! 

So, NOW we can actually start doing the FBA!

#3 - the actual FBA!!!

If you remember from #1 above, I needed to adjust the front piece by 3 inches = 1,5 inch (4cm) on one pattern half. A rule of thumb in adjustment is 1 cm per cup size (counting from B), which would in that case suggest that I wear a size F, which I do :-)

But - another aspect to take into account is the "finished measurements" of the garment. For my bust, being 39'', the ready measures for the garment around the bust is 43'' which is more ease than I like, even for a loose fitting blouse. Therefore I'll do an FBA of 2cm on a half front, instead of 4cm. 

Time to cut up the pattern! For this step I strongly advise working over a grid since it makes life so much easier.

Remember I said we want to cut within of our darts to not distort the design. 
  1. The first cut is vertical from the bottom, through the waist dart, to the apex
  2. The next cut is from the apex to the armpit. Aim for anywhere on the lower 3rd of the curve - but DO NOT cut all the way through!! Leave just a tiny piece of the paper.
  3. The next cut is from the side through the bust dart up to the apex - but NOT all the way, leave a little just before reaching apex.
  4. The last cut is a horizontal cut from the waist dart to the centre fold side. Cut all the way through.
All the cuts are marked in red on my pattern:

Now remember for my FBA I wanted 2cm on the half front. When I cut and spread I want 2cm space in every direction:


Shove a new piece of tracing paper underneath and draw the darts again and true up the legs:

Note! Your new darts will be way bigger than the old ones (compare the blue bust dart with the old yellow one). This makes total sense - try fold a paper into a cone. I tall cone means longer dart than a short cone, right?! The waist dart now is extended all the way down, because I don't want to add width to the waist, but you can shape it differently if you like.

And if you wanna be fancy then trace the whole thing on new paper and there you go!!

The finished piece!! 
No go sew! The result will look something like this (the blouse has been worn for a couple of hours in the picture if you wonder why I haven't ironed it properly).


Still quite roomy and comfy but skims off the body nicely. Compare with the non FBA'd pic from the top... I rest my case.

/Alexandra

Sunday, November 3, 2013

Paper towels all over the place

With a baby in the house who's just starting to eat food with a spoon, we go through insane amounts of paper towels each day. Add 5 snotty noses to the household and the equation sums up to finishing a roll in about 2 days.


Roll, almost finished.

Well, that doesn't feel so good. What to do, what to do. The immediate thing springing to mind is of course to use some sort of cloth. When searching the market and reading blogs I learned about "unpaper towels" as they are called in US. Clever name, by the way. When browsing through Etsy I learned that birdseye cotton seems to the best fabric to use, and although I don't mind buying from nice independent Etsy people - i do HATE the wait (and sometimes very long wait when customs wanna interfere with the process).

Besides. How hard can it be to make them myself? Well. Another hour past on google and birdseye cotton is nowhere to be found in all of Europe. At least not without costing an absolute fortune. Then my hubby got the idea to have a look in our cupboard. And found PILES of cute old kitchen towels from way back that we never use since there are too many of them! Score!!


I love this. The towels are from both our grandmothers Maja and Eivor that are no longer with us, with their maiden name initials sewn on by their hands. Bless them!

I started out with 4 towels, cut them up and ran them through the serger and voila, my own "unpaper towels". In one hour I easily made 25 pieces, including cutting and ironing (!).

Aren't they just super cute?!?!?!

Now, how to store these beauties? They need to be readily available and take little room on the table or it won't work.... I had to try a couple of ideas, but not so sure about any of them. Wanna help?
How about rolling them up?
At least there won't be much confusion on what to use.

Or rolling them up individually?
Pretty, but too much work in reality.

Well, that was my evening project. Thank's grandma - I miss you!

Good night!
/Alexandra

Saturday, November 2, 2013

Thurlow pants

I did it! I made pants - finally. I have been scared crazy because ill-fitting pants are really awful and there are so many ways pants fit can fail that you don't even know where to begin. But I need pants desperately so, as a part of this winter SWAP, I've decided to make two pairs. And they are gonna be great. They just have to.

The pattern I'm using is Thurlow from Sewaholic Patterns. This brand of patterns are developed with pear-shaped women in mind. That's a good starting point for me.


Let's muslin away, shall we!

The key to sewing success is making a muslin (or several). It is not the most fun part of the process, but I've never regretted making one. There is always some little tweak you wanna do.

Muslin #1 (using some old 90's curtains I found in hubbies old basement storage)

According to the sizing chart I measure a size 10. After reading some reviews I learned the pattern runs large so I decided to cut a size 6. The first muslin is a size 6 with no alterations:


Okay, not the best photos in the entire universe, but you can still see that the fit is not too bad actually. You can tell they are a tad tight over the butt and there is some excess fabric pooling around the thighs, but all in all probably a better fit than most pants I can find in a department store. But for the next muslin I decided to

  • add some more butt room by increasing the crotch depth on the rear pieces 
  • lower the crotch hight in the front 
  • remove about an inch (2,5cm) on both legs all the way down, along the inseam on the back piece.

Muslin #2 

It seams like I don't have enough thighs to be a straight "pear" since I need plenty of booty space and still I get fabric flapping around them ol' legs. Or it is just the style of the pattern - I prefer fairly slim fitting pants and these are probably kinda loose in the design when I think about it. Oh well.


Now you can see the butt fits into the pants but since I still had plenty of room around the legs I decided to pin out one more inch PER LEG. I guess it would have made more sense to cut a smaller size (probably a size 2) and then add more butt room instead. Anyhoo.. I decided not to make a third muslin (feeling a little cocky now!).

Also, I expect some pregnancy fat to come off in near time, so I want everything I sew to just fit, so that I still can wear them when I've lost some. So, yes, a little on the tight side here.

Time for the real deal - cutting the fashion fabric!


Sewing up the pants

First step was to make pockets, including the double welt pockets. I had never done welt pockets before and I had to do some serious thinking to get it right. I am not even sure I like the look of them that much. I prefer single welt pockets so I think that's what I'm going to make on my next pair. For the pocket lining I chose a vintage fabric that I've had laying around for ages. The fashion fabric is nice black wool suiting that I got at a bargain price. These pants comes down to about 150SEK (15 GBP/ 17 €/ 23 US$) including all the zippers, buttons and stuff. A darn good price for good quality. If they fit, that is....

Front pocket lining
Back pocket lining 
Finished double welt pocket! Neat, huh!
(ignore the white basting stitches - i'll remove them later)


Sidenote: you probably can't see the details properly but with these linings I'll always have cookies in my pockets ;-) Lucky me!


Tadaa - zipper installed!!
So far so good.

The next challenge was the fly.
Tricky and fiddly but I managed eventually.  Now the pants can actually come on and off. Handy, handy.

I do regret making the fly lining in the printed fabric though. I should have used the black fabric (or something dark) - now I'll risk having a white strip shining from the side if the fly isn't completely flat against the body. I might just have to stand still while wearing them. Sitting down is for loosers anyway, right? Seriously though, I am contemplating of putting some black fabric paint on the left side of the zipper (in the picture). Any other brilliant ideas? I thought I had such a cute thing going on... with a balloon and everything.
Fly lining - with a balloon!!
Time for waistband

I don't particularly like attaching waistbands. It is fiddly to get the lining sewn  without it looking like a kid did it when you do it from the outside. Sometimes I slip stitch the lining by hand but it is slow. Instead I wanted to try putting bias tape on the waistband lining and let it hang down past the sewing line. Then when I "stitch in the ditch" from the outside any crooked lines won't be too apparent. First time I am doing that too, by the way.

Look at this lovely finish!!!
Almost looks professional if you ask me.

And then some belt loops. Can you see the "stitching in the ditch"? No, I thought so. It is completely invisible!! Key to success? Go slowly!
MOMENT OF TRUTH!!!! - THE FANCY SCHMANCY PANTS ARE DONE
It was surprisingly hard to take these photos without everything looking completely black. Maybe photos outdoors would have been the trick, but it is already dark out now and I didn't wanna wait.
I managed to fit into the pants (hooray!) BUT they were definitely on the tight side. I better shed that baby fat pretty soon or... 

Final verdict
All in all I am very pleased with my very first pair of pants! I would wear them in public and that is not a bad review. I think I might add a liiiiiittle extra room in the next pair though.

Rear view.

Put on a massive belt to show the belt loops better.
And Indiana Jones never goes out of style anyway...

Look at all that posing business going on!

AND a final butt pic. Enjoy!

/Alexandra

Friday, November 1, 2013

A little note on respect for clothes...

In my slow fashion section I go on about reusing clothes that are not fit for wearing any longer. I thought I'd share examples of what I have done recently in that department.

When I was pregnant I wore this roomy, comfy, tunic (not actually maternity clothing).
Picture borrowed from Gudrun Sjödén.


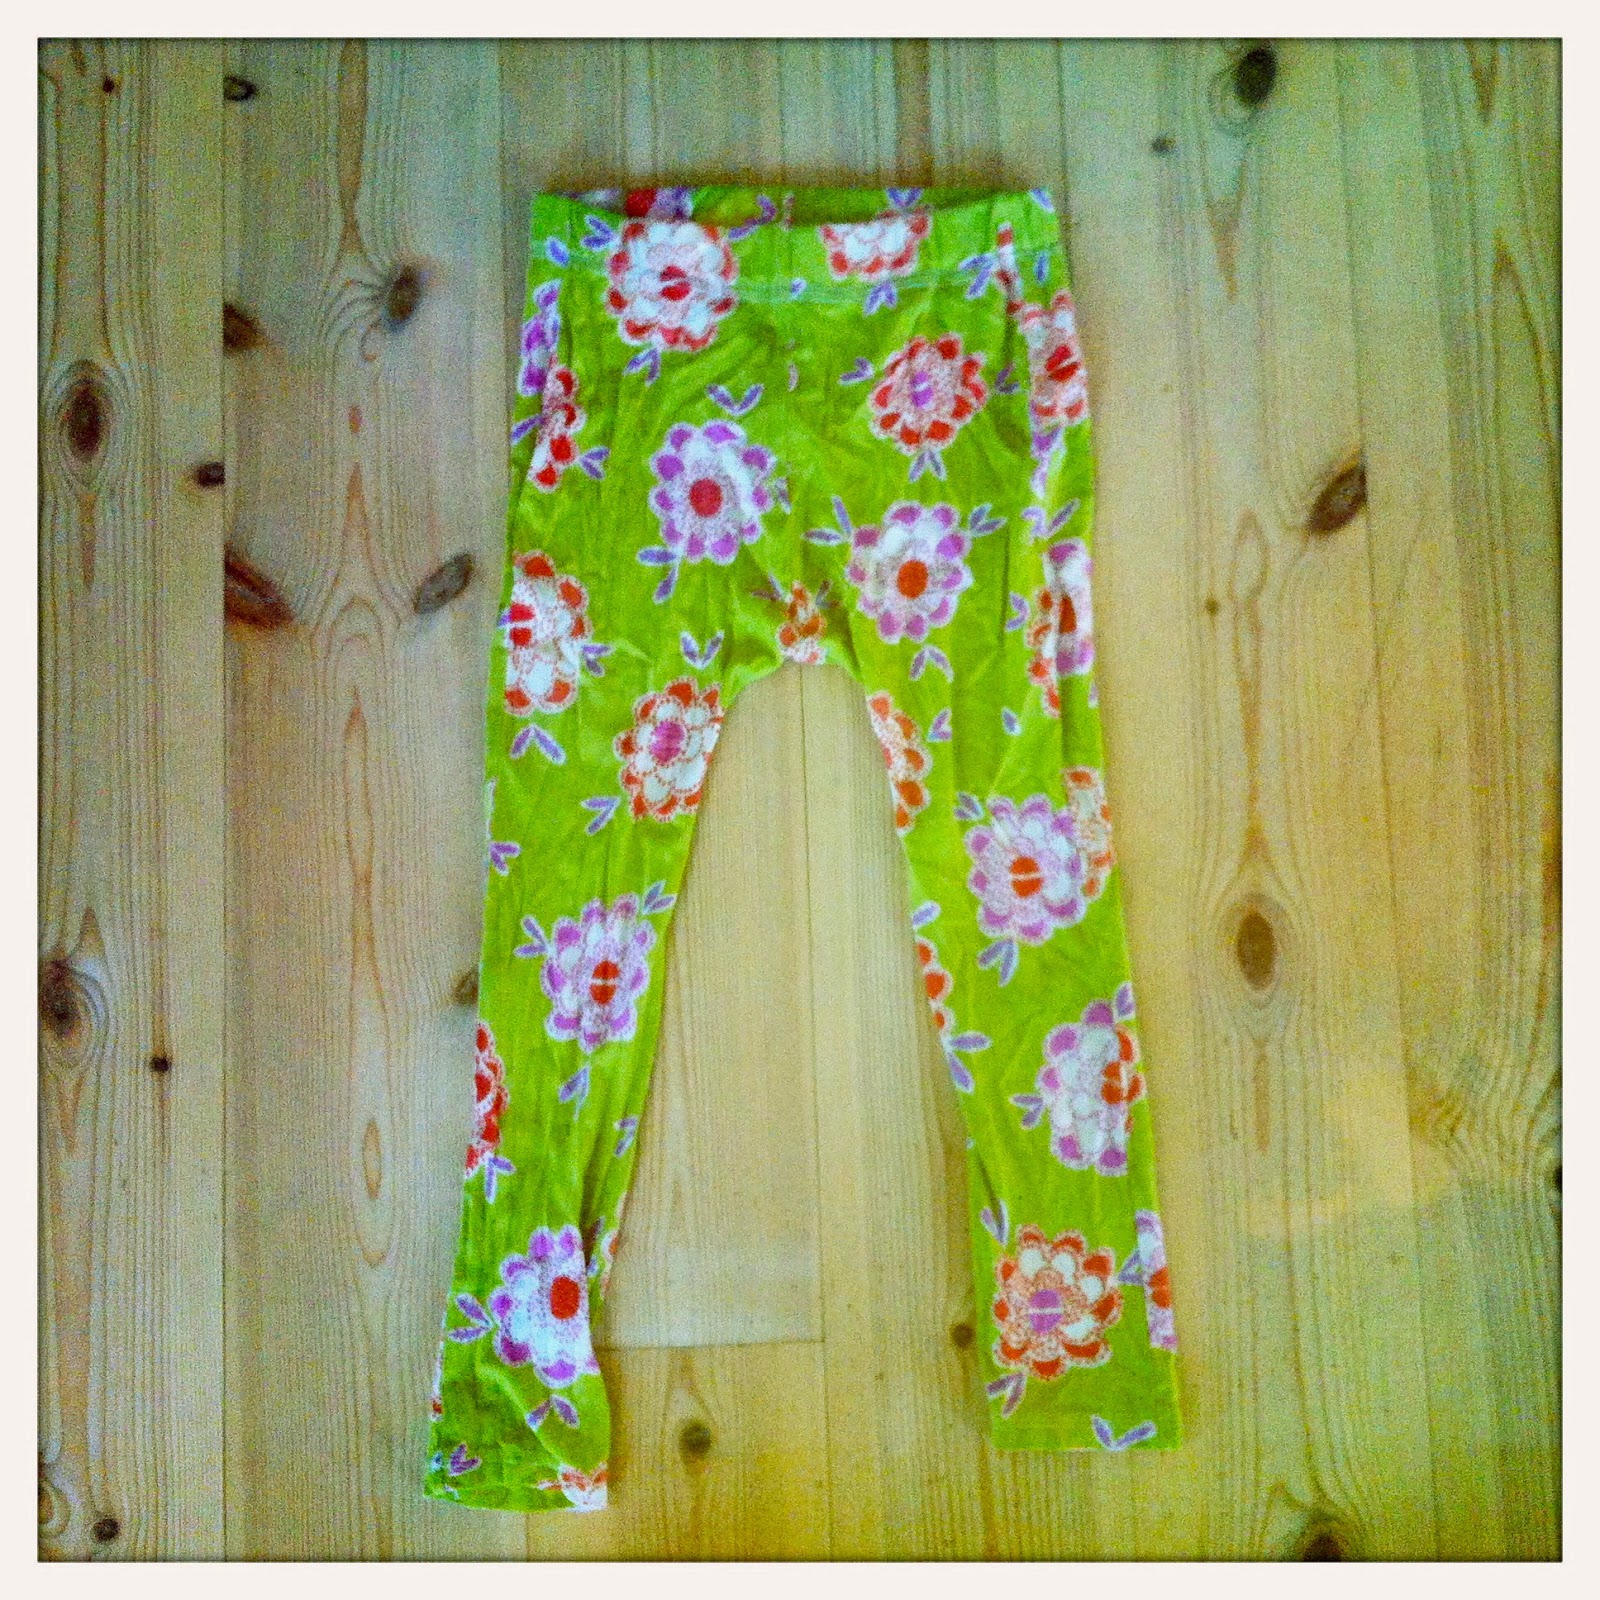
I love the print, but to be honest, the color makes me look like I have a terminal illness. What to do... Well, why not turn it into leggings for my 6y old super hero? Yes!!!

Why is this brilliant? Because she gets pants that are unique? Because I don't have to buy her new pants? Because I still get to see this wild print? Yes. But the best reason is that she gets clothing with less chemicals!! The fabric has been washed a lot and most of the bad stuff is hopefully gone. Kids are more sensitive than adults to toxics so I like to be careful with the precious ones. Score!


Another thing I made the other day is a beanie for momma! :-) My husband had this green sweater but the delicate fabric was ripped in a couple of places. It was not mendable (because if it was, OFCOURSE that would have been my priority ;-) hrmm) so I simply had to think of something else.
I liked the row of buttons so they got to stay. Whattaya think?

 ->


And other stuff you could make, out of scraps even, is baby wipes! I promise your baby would rather have its a** wiped with soft cotton than some harsh drenched crap you can buy just about anywhere (yes, I have a strong opinion). Go on - ask your baby. If it responds with something along the lines of "gooogh", "gaaah" or "weeeeh", then you know I'm right. Pretty much any absorbent and soft fabric is suitable for this such as old t-shirts,  towels etc. Avoid microfiber though.


/Alexandra