
Why and when you need to make an FBA
Most patterns are constructed with a cup size B in mind (sometimes a C). A cup size is a relative measure and not a fixed volume. That means that you can be a B-cup and still span across sizes 0-18 (or whatever) - the volume of a B cup size 18 is a lot bigger than a B cup size 0 . If the pattern maker should cater for all cup sizes they would need to make one pattern for every cup size AND every size!! Imagine that pattern sheet!!! Gee, that would be crazy, which is why they stick with only one cup for all sizes and let us do the adjustments at home. It was so much simpler when women were all Barbies. ;-)
See that should probably answer your question on WHY ON EARTH clothes in the store never ever fit you right. Same reason. All made for the same one cup size...
Now. For those of you who are a little intimidated by this, or that may be afraid that you are changing the design of the garment. Chill out. It is really quite simple and this is done to KEEP the design and not to distort it.
I will be showing FBA on the Alma Blouse from Sewaholic Patterns.

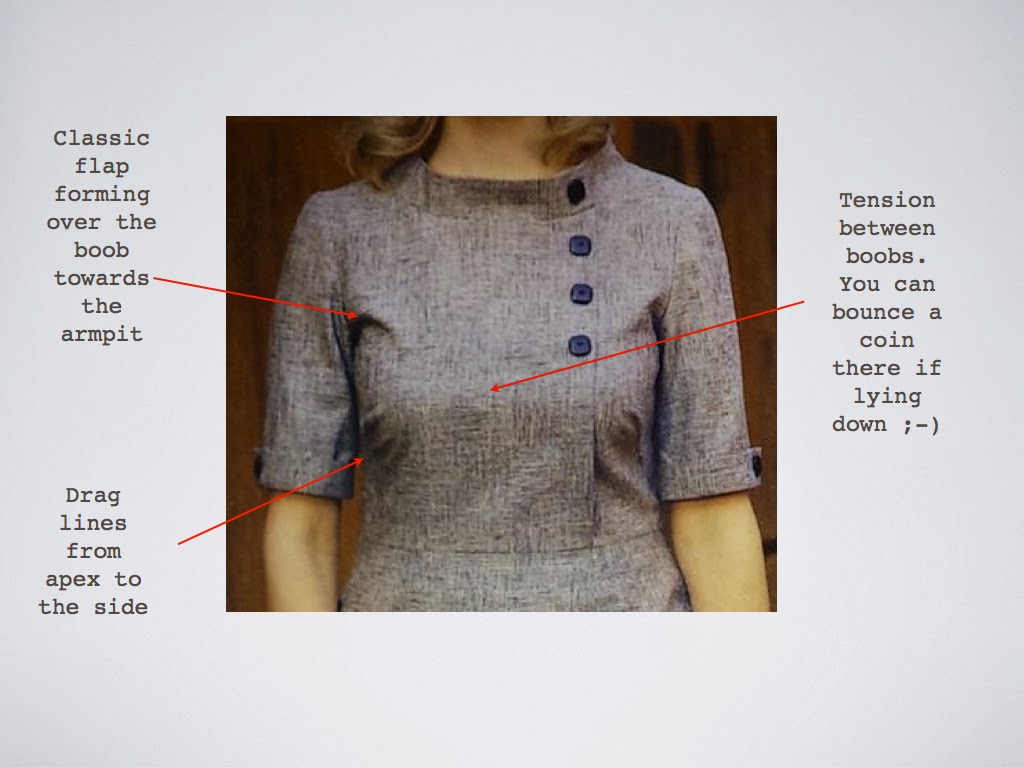
Signs that you need an FBA
 |
| Fashion photo borrowed from Ottobre 5/2011, sewing pattern magazine. |
If you would solve the above problems by just wearing a larger size, then the fit around your waist and shoulders will not be great. Just because the boobs are big, you haven't changed your frame, right?
In this picture I am wearing my first Alma. I did just that, i.e. no FBA and went with a larger size. No complete disaster but there is definitely a lot to ask if you're picky, like me.
 |
| No FBA, larger size to fit the bust. |
Another 'classic' we are all much too aware of, is the buttoned shirt where you are afraid to move your arms in case the buttons will pop off (have you ever taped, sewn, safety-pinned or glued the fabric in place between the boobs to feel secure?). I was just done wearing shirts altogether until I learned about FBA.
Another graphic to illustrate this (I am such an artist!):

You see that the green "fabric" needs to be way longer than the red "fabric", even though the neck and the waist are in the same places. This drawing is necessary to calm those of you who fear your garment will be bigger and tent-like after a FBA is done. It won't be, but your boobs will fit.
The FBA process
Now there are certain steps to take in order to succeed with the pattern alteration. I am sure there are many different ways to do this, but this is how I do it. If you have a better way, do tell! I am eager to learn!
#1 Find your size and trace your pattern!!
Really goes without saying, but you will be doing some cutting so don't spoil the original sheets.
What size to cut? It is not always a clear answer to that, since we are all different. Some women have broad shoulders and should select a size that accommodates them, while others have a tummy to include in the game. If you have sewn some in the past you may have an idea on how the rest of your frame fits into patterns? If not. Do measure your "high bust" measurement instead. That is putting a tape measure under your armpits, around your back and OVER your bust (as opposed to across your widest part). Then measure your waist, hips etc and select the size that is closest to fit.
For myself I've learned that my shoulders are pretty average and usually fit into patterns without alteration so I just go by the waist measure and that's my size. The boobs will be taken care of soon.
My measures:
High bust (as described above): 36 inches
Waist (my skinniest part of the torso): 30 inches
According to the pattern back table those measures are exactly a size 10. Meaning that if I had a B-cup, a size 10 would fit me like a glove. For reference my real bust measurement is 39 inches = 3 inches larger than the size 10 of the table.
So, I will now trace a size 10 exactly as is and cut it out.
 |
| Size 10 straight from the pattern. Darts in yellow. |
#2 Find your apex and make sure the darts point to it.
This step is more important than you might think, you'll see why in a minute, so don't give this a miss.
If you look at the pattern, all darts usually point towards the same point - the apex. Apex being the highest point of your chest (for most people, the nipple). If you run right into a wall, your apex is the point that hits the wall first, unless your nose beats you to it ;-)
Mark your apex on the pattern. Is it in the same place as pattern wants it to be? Congratulations, move on to #3. If not, go to a plastic surgeon and have your nipples moved into the correct location. OR, you can alter the pattern, which is what I prefer. It is cheaper too.
 |
| Original apex marked yellow. My apex marked blue. |
The easiest thing is to move the waist dart. Just put a piece of paper over the yellow one and copy it. Then put the copy in the position you want UNDER the pattern sheet and then just trace a new one. My pattern now looks like this:
 |
| Blue is my new waist dart. |
Now there are two ways of changing the bust dart so that it points towards YOUR apex. You either just start at the side markings of the dart and adjust the angle of the point, then true up the dart legs. The reason I don't prefer to do it this way is because you then change the design of the garment (if you're picky). The bust dart will then, in my case, be tilted slightly downwards instead of more upwards.
The other way to do it is to lower the entire dart the same amount as your apex is lowered, in my case 3 cm. Before you do that it is wise to fold up the current dart and mark the sideline of the "sewn" garment so that you know what it should look like after you have moved the dart.
 |
| Blue is new bust dart, 3 cm lower than the yellow. |
Cut off the paper between the yellow dart legs (marked blue line) and fold up your new dart to verify the shape of the side seam.
Okay, so why was all this hassle important again? Well, now that everything points towards apex you can go crazy in the next step and still be sure that you add fabric only in the right places - without adding to your waistline, armpits or other places!!! And it kind of looks shitty when a dart points in the wrong direction too. And this goes for other types of FBAs too! As long as you keep your FBA in the middle of dart and/or tuck markings you are not distorting the design - it doesn't matter from what place or angle the dart/tuck originates!! Beautiful!
So, NOW we can actually start doing the FBA!
#3 - the actual FBA!!!
If you remember from #1 above, I needed to adjust the front piece by 3 inches = 1,5 inch (4cm) on one pattern half. A rule of thumb in adjustment is 1 cm per cup size (counting from B), which would in that case suggest that I wear a size F, which I do :-)
But - another aspect to take into account is the "finished measurements" of the garment. For my bust, being 39'', the ready measures for the garment around the bust is 43'' which is more ease than I like, even for a loose fitting blouse. Therefore I'll do an FBA of 2cm on a half front, instead of 4cm.
Time to cut up the pattern! For this step I strongly advise working over a grid since it makes life so much easier.
Remember I said we want to cut within of our darts to not distort the design.
- The first cut is vertical from the bottom, through the waist dart, to the apex
- The next cut is from the apex to the armpit. Aim for anywhere on the lower 3rd of the curve - but DO NOT cut all the way through!! Leave just a tiny piece of the paper.
- The next cut is from the side through the bust dart up to the apex - but NOT all the way, leave a little just before reaching apex.
- The last cut is a horizontal cut from the waist dart to the centre fold side. Cut all the way through.
All the cuts are marked in red on my pattern:

Now remember for my FBA I wanted 2cm on the half front. When I cut and spread I want 2cm space in every direction:

Shove a new piece of tracing paper underneath and draw the darts again and true up the legs:

Note! Your new darts will be way bigger than the old ones (compare the blue bust dart with the old yellow one). This makes total sense - try fold a paper into a cone. I tall cone means longer dart than a short cone, right?! The waist dart now is extended all the way down, because I don't want to add width to the waist, but you can shape it differently if you like.
And if you wanna be fancy then trace the whole thing on new paper and there you go!!
 |
| The finished piece!! |
No go sew! The result will look something like this (the blouse has been worn for a couple of hours in the picture if you wonder why I haven't ironed it properly).


Still quite roomy and comfy but skims off the body nicely. Compare with the non FBA'd pic from the top... I rest my case.
/Alexandra
THANK YOU! I have been searching for an hour on how to handle an fba with a vertical waist dart. Tackling my pattern tomorrow! :)
ReplyDeleteOh, just glad if it helps anyone!! I sure struggled before I figured it out :-) but now this is my standard alteration that I do on all patterns without even thinking. Tell me how it went!
DeleteI see you @Nakisha lol This was a great post!
DeleteBrilliant. And it helps that you are the same size as me.
ReplyDeleteYeah, that is always handy! Hahaha.
DeleteOh lawd. I know in my head these are excellent instructions. Still, I've got to reread this maybe 1,000,000 times and it just might stick.
ReplyDeleteMy self promise is to raise the level of my sewist skills therefore this procedure is a must. But aye yi yi it still seems difficult . . . .sigh. Of course I must practice on muslin.
Thank you ever so much for writing this post. I'll surely pin it for reference.
Cheers,
Lyric
http://www.sewcroandquilt.wordpress.com
Can you please give a few more details on finding and marking the apex? I have been trying to do a FBA but once I get everything moved and put my test together the bust apex is low. Thank you for a very informative tutorial.
ReplyDeleteHmm, is it for knits and jerseys or for woven fabrics that you struggle? For woven fabrics it should be sufficient to take a tape measure and measure from the shoulder seam to the apex on the body and transfer to pattern. For knits and jerseys it is trickier since the fabric stretches and the garment apex usually ends up lower than you want it. One way to try to find apex on stretchy fabrics is to put on a top with similar fabric and mark the apex with a pin while wearing it. Take the top off and measure to transfer to the pattern. Does this help?
DeleteThanks for clarifying that apex bit....I was about to ask the same thing.
DeleteYes thank you I needed this clarification too and thank you so much for this post!!!!!!!
DeleteGreat tutorial! Thanks!
ReplyDeletewHOO!!! The 'ladies' are happy with their new found freedom!
ReplyDeleteThe hours I spent searching "double darted fba"... it probably would have been quicker to have a boob reduction. Super thank you! :)
Haha, so happy your ladies are happy :-D
DeleteThank you for a thorough write-up! :) I feel much more confident tackling this now.
ReplyDeleteHello, I enjoyed reading your post. Can you explain how one determines where the apex is supposed to be? Is there a standard measurement to take? I am looking forward to sewing up some shirts and using a FBA to do it right. Thanks for sharing your knowledge! Also, I have to say this: although your garment fits much better in the last picture, like most women, it looks like you would benefit from having a bra fitting by a professional to lift your girls up a bit. When I had my first professional bra fitting, it literally changed my life, and I even walked taller. Now I also wear a leisure bra to bed at night to prevent the breast tissue from sagging. Most woman are wearing the wrong size bra and don't understand how to choose the correct size. I was wearing a 40C but my correct size is 38DD! If the band of your bra is higher in the back than it is in the front, it doesn't fit properly! We also tend to wear the straps too loose. It doesn't matter how large or small one's boobs are, getting fit and knowing what size cup and band to wear will also improve how your garments look on you. You can adjust your patterns all you want but if your bra size is all wrong... just sayin'.
ReplyDeleteHi, sorry for the late reply here. I know exactly what you are talking about. I actually know how a bra should fit (and I agree that it is no where near ideal in these photos). At that time, though, I was still nursing a baby and could not wear anything with wires since I had problems with recurring engorgements. The girls are located in a better position these days (and are a lot smaller too). :-)
DeleteThis technique I read over and over and will continue until it is second nature. Your humor makes the technique quite painless, LOL.
ReplyDeleteThank you for this tutorial.
Cheers,
Lyric
https://www.sewlyricalyvintage.wordpress.com
I'm new to sewing from paper patterns and for some reason I thought it would be a good idea to make a dress as my first garment. My problem is that although I'm usually a UK size 16-18 on top and a 14-16 on bottom, I wear a G cup bra and have a slightly larger waist measurement that the pattern states for the largest size (B: 40", W: 32". Mine are B: 44", W: 36"). How do I size up the pattern for both measurements when the bodice is in 6 pieces?
ReplyDelete(For reference, the pattern is here http://sewingpatterns.com/sub_item.php?item_num=6723new&model=%&new_category=&view=gallery&brand=New_Look&category=Dresses&pageGoto=108&pageFormat=3|186|186&pageCount=18&search=&return=yes )
Hi! Since the pattern you are looking at is with princess seams, then it _can_ be an even easier way to adjust the pattern right. If you measure your high bust measurement and then your waist and select the size that closest cater to both measurements, then you add a lot of extra seam allowance in the princess seams, and at the bottom of the front pieces. Sew all bodice seams except the princess seams and then put it on, inside out, and pin the shape you want right on the body (or get someone to help).
DeleteIf you'd rather work on the paper pattern, then you measure the difference between your high bust and your full bust. Say that comes to 2 inches, then you need to add 1 inch in the middle of the princess seam (in the apex area) and then grade out towards the armpit and waist. The front pieces will need to be about 1 inch (at least) longer too in order to get an horizontal line around the body.
Gee, hard to explain in words without pictures! If you google FBA + princess seams, then I bet you'd find a tutorial somewhere. I might do one eventually, but right now I am too busy unfortunately.
Good luck!!!!!
Hi,
ReplyDeleteI'm not new to garment sewing but I discovered the online sewing community last year after taking up quilting! I just wanted to say many thanks for these two tutorials as I too was just cutting clothes to a larger size to accommodate a large bust but getting baggy fits and the flappy bits between bust and armhole, which defeated one of the aims of handmade garments ��. In fact looking at a lot of my store bought clothes I can see this issue.
So many many thanks for showing how to do this and my next Belcarra and Alma blouses will have an FBA and fit me perfectly!
Eve
Keep sharing beneficial articles like this.It's quite helpful.
ReplyDeleteSportsCEO
Thank you thank you thank you. I have been doing FBA for my H size girlies for 2 years now but it never seemed to go right. Its because none of the tutorials have ever mentioned doing the dart waist adjustment BEFORE doing the fba. I am sure this has been the problem all along and am now off to realter my fav pattern to see if it works.
ReplyDeleteyes like Yizz said, this is the first time I've seen the discussion on checking to see if the pattern darts point to the right place on your body. just tried a fba for someone in a muslin sloper and then marked the resulting apex points on her and couldn't figure out why they were so far off! I'm back at the drawing board and this might fix my problem. very grateful for your post!
ReplyDeleteReally appreciate your tutorial, it has helped me demystify ' New Look 6808'
ReplyDeleteThanks again,
Anne
This comment has been removed by the author.
ReplyDeleteThank you for this explanation! I am just starting my quest to learn what in the world an FBA is, and how to do one. :) Great tutorial!
ReplyDeleteБлагодарю за статью. Возникает проблема вто широкой вытачки, она тапоршится ближе к соску. Как её решить, говорят, чтобы вытачка красиво легла, раствор вытачки должен быть не больше длины вытачки зеленная на три, а в таких вариантах раствор большой и вытачка торчит около ориола. Что порекомендуете?
ReplyDeleteThis comment has been removed by the author.
ReplyDeleteОпечатка на 4 ой строчке. (... чтобы вытачка красиво легла на груди...)
ReplyDelete